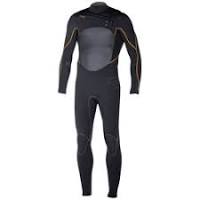
Wetsuits > Surfing Wetsuits > Men's Surfing Wetsuits > 3/2mm Wetsuits 3/2mm Mens Surfing Wetsuits by O'neill, Billabong, Quiksilver, Rip Curl, Hyperflex and more! Our 3/2mm men's full suits come in back zip and chest zip. Chose from breathable flatlock stitched suits for warmer water to sealed seamed GBS (Glued and blind stitched) for colder waters. Chat or call us with any questions. Take advantage of our Free Shipping! Need help choosing the right gear, see our Buyers Guide or chat with one of our wetsuit experts online or by phone. Priced Low to High Priced High to Low Rated Low to High Rated High to Low Hyperflex Cyclone 2 4/3mm Junior Wetsuit Boys &... Hyperflex Cyclone 2 3/2mm Junior Wetsuit Boys &... Hyperflex Cyclone 2 3/2mm Men's Wetsuit - ALL NEW... Hyperflex Cyclone 2 3/2mm Flatlock Men's Wetsuit... H2Odyssey Men's Wetsuit 3/2mm Surfing Diving...">
Psychofreak Backpack
psychofreak backpack

Still not sure what to order? Price - Low to High Price - High to Low Quarters Red 21" BoardshortsHome > Wetsuits > Surfing Wetsuits > Men's Surfing Wetsuits > 3/2mm Wetsuits 3/2mm Mens Surfing Wetsuits by O'neill, Billabong, Quiksilver, Rip Curl, Hyperflex and more! Our 3/2mm men's full suits come in back zip and chest zip. Chose from breathable flatlock stitched suits for warmer water to sealed seamed GBS (Glued and blind stitched) for colder waters. Chat or call us with any questions. Take advantage of our Free Shipping! Need help choosing the right gear, see our Buyers Guide or chat with one of our wetsuit experts online or by phone. Priced Low to High Priced High to Low Rated Low to High Rated High to Low Hyperflex Cyclone 2 4/3mm Junior Wetsuit Boys &... Hyperflex Cyclone 2 3/2mm Junior Wetsuit Boys &... Hyperflex Cyclone 2 3/2mm Men's Wetsuit - ALL NEW... Hyperflex Cyclone 2 3/2mm Flatlock Men's Wetsuit... H2Odyssey Men's Wetsuit 3/2mm Surfing Diving...
H2Odyssey Vapor Men's Wetsuit 3/2mm Flatlock -... Hyperflex Cyclone 2 2.5mm Men's Short Sleeve... NeoSport Men's 3/2mm Full Wetsuit Premium... Men's Hyperflex VOODOO 3/2mm Front Zip Fullsuit Men's Hyperflex VOODOO 3/2mm Back Zip Fullsuit"I just wanted to surf longer" No other words should have more meaning to those who live in cold climates than those uttered by Jack O'Neill back in 1952. The inventor of the first ever wetsuit, we all can thank him for being able to enjoy the frigid waters in our backyard daily. Alphabetical: A to Z Alphabetical: Z to A Price: Low to High Price: High to Low O'Neill 365 Admire Cross Back Top - Multi O'Neill Alliance Traveler Backpack O'Neill Bahia Bikini Bottom - Grapefruit O'Neill Bahia Ruffle Bikini Top - Grapefruit O'Neill Cabo Ruffle Top O'Neill Cabo Shirred Back Hipster Bottoms O'Neill Cricket Top - White O'Neill Gooru 3mm Glove O'Neill Heat 5mm Round Toe Boot

O'Neill Iveta Tank Top - Multi O'Neill Jasmine Dress - Grey O'Neill Katie Backpack - White O'Neill Leighton Sweater - Multi O'Neill Lodown Hat - Blue O'Neill Margarita Sandal - Black O'Neill Margarita Sandal - Brown O'Neill Mila Shorts - Black O'Neill Mix Up Wallet - Black O'Neill Monsoon Poncho Change Towel - Blue O'Neill Mutant 5/4 Hooded Wetsuit O'Neill Mutant 6/5/4 Split Toe Boot O'Neill Naples Belt - Black O'Neill Naples Belt - Khaki O'Neill Naples Wallet - Black O'Neill Naples Wallet - Khaki O'Neill Oasis Beach Tote - Orange O'Neill Periscope Tee - Royal O'Neill Periscope Tee - White O'Neill Pina Colada Tank - White O'Neill Playa Bralette Top - Black O'Neill Psycho DL 1.5mm Glove O'Neill Psycho DL 3mm Glove O'Neill Psycho SL 5mm Glove O'Neill Psycho Tech 5.5/4 Hooded Wetsuit O'Neill Psychotech 4/3mm Split Toe Boot O'Neill Rooks Hat - Grey O'Neill Shortrib Sherpa Hooded Zip Up - Rust Brown

O'Neill Solid Hooded Pullover - Olive O'Neill Solids Crochet Hipster Bikini Bottoms - Burgandy O'Neill Steller Wallet - Yellow O'Neill Stout Hat - Blue O'Neill Sunny Hat - Black O'Neill Superfleece Glacier Lined Shirt - Navy O'Neill Superfleece Quadra Quilted Hooded Zip Up - Olive Green O'Neill Superfreak 2mm Tropical Split Toe Boot O'Neill Tiki Ti Sandals - Black O'Neill Timeshel Long Sleeve Shirt - Blue O'Neill Traveler 2 in 1 Luggage Set O'Neill Traveler Adventure Passport Wallet - Black O'Neill Traveler Cargo Shorts - Navy O'Neill Trio Backpack - Brown O'Neill TRVLR Hat - Grey O'Neill Women's D-Lux Mod 5/4 Hooded Wetsuit O'Neill Women's Psycho Tech 6/4 Hooded Wetsuit O'Neill Women's Psychofreak 4/3 Zen Zip Wetsuit O'Neill Women's Superfreak 5/4 Hooded Wetsuit O'Neill Women's Superfreak 5/4 Hooded Wetsuit - Black/Deepsea/Spyglass O'Neill Wondrous Hat -Grey O'Neill Yambao Hat - Camo Green
O'Neill Youth Epic 4/3 Wetsuit - Black/Graphite/Blue O'Neill Youth Epic 4/3 Wetsuit - Graphite/Black/Neon Red O'Neill Youth Girls Epic 4/3 Wetsuit -Black/Berry/Aqua O'Neill Youth Mutant 5/4/3 Hooded Wetsuit Sale O'Neill Heat 5mm Round Toe Boot Sale O'Neill Heat 7mm Round Toe Boot Sale O'Neill Women's D-Lux Mod 5/4 Hooded Wetsuit Sale O'Neill Youth Epic 4/3 Wetsuit Sale O'Neill Youth Mutant 5/4/3 Hooded Wetsuit O'Neill Psycho Tech 4/3 Hooded WetsuitWhen it comes to any kind of scary costume, special effects makeup is key. Plus, it's easy to create movie style magic at home as long as you have the proper utensils. You'll be surprised to see that a simple wound or gash will transform your already scary look. You can make yourself look dead, burnt, or severely injured and you'll leave people wondering, "Whoa, is that person okay?" Make people do a double-take by working with basic prosthetics and liquid latex. Although the final result looks complicated, we promise that these gruesome looks are very simple to recreate at home!

Face Cut Makeup TutorialAdding a gash to your neck is a great and easy way to look as scary as possible. This makeup application is fairly easy, just make sure you have all the supplies listed. You'll need extra flesh and Fixative A to keep the fake skin sealed. A bruise color-ring and 8-color palette are necessary for the discoloration around the wound. Next, you'll need lots of blood of course! Make sure to pick up coagulated blood, stage blood, and squirt blood. Finally, you need some sponges and brushes to complete the application. Have your triangle sponge and medium makeup brush handy. A pen cap or similar object should be nearby because you need to create a cut in the fake flesh.Step 1: You'll need to decide the placement of the gash. When you've picked the perfect spot, put your extra flesh on the entire spot you've mapped out. Make sure it's as long as you want it to be.Step 2: Now it's time to slice your extra flesh! Take your pen cap or a similar sharp object and make a cut in the extra flesh.
This will be used as a marker to indicate where the blood will go.Step 3: It's time to seal the extra flesh. Get out your Fixative A and put it on the piece of extra flesh, now wait for it to harden.Step 4: Take out your triangle sponge and 8-color palette because you'll need to blend the gash to match your skin tone. Begin to stipple the colors from the palette over the extra flesh. We recommend using the green, yellow, and red from the bruise color-ring to make the wound look realistic and gross!Step 5: Here comes the blood! Use the medium brush to paint on the coagulated blood. You'll want to paint inside the indent you've made with your pen cap or other sharp object. Use the stage blood on top of the coagulated blood and place it around the fake skin too.Finished Look: Last but not least, it's time for the "squirt blood." Let this blood drip down your neck as a cool makeup effect. Put as much as you want!Fake Wounds and Gashes Makeup TutorialThere are even more cool wounds and types of gashes that you can create.

These makeup looks are bound to gross out all of your friends. Again, this makeup application doesn't take a lot of effort; just make sure that you have all the necessary supplies. To recreate both the bullet hole and claw mark wounds, you'll need the appropriate prosthetics which you can buy on our site. Again, the liquid latex and bruise color-ring are vital to create the wounds. Dig in your makeup bag for a skin tone foundation. Stage blood, tissue, and a triangle sponge will also be needed!Steps 1 and 2: It's time to indicate where you want your prosthetics to go. Place dots on your skin with an eyeliner pencil so makeup placement will be easy. Keep your package handy because you'll need those instructions too. Find the adhesive that comes in the package and use that to glue the prosthetic pieces to your skin.Steps 3 and 4: Next, you'll need to use the liquid latex. Around the edges of the prosthetic pieces, apply the liquid latex and be sure to smooth out the creases. Use the tissue to blend in the edges of the wound on your real skin.

Remove any excess tissue that isn't glued onto the liquid latex. Be sure to let it dry out. Take your foundation and apply is around the edges of the prosthetic piece. Make sure to cover all of the liquid latex.Steps 5 and 6: Now you will need to get your bruise color palette. Use the green, yellow, brown, and red to make your wound look nasty and bruised. Last but not least, add as much stage blood as you want!Finished Look: As you can see your finished look will transform your appendage into a bloody, disgusting mess! Ass ample amounts of fake blood and you'll have everyone thinking you've been bitten, beaten, or shot, or maybe all three at the same time.Zombie Bite Makeup TutorialHave you ever wondered what would happen if a zombie actually bit you? Of course you would turn into a zombie, but what would the bite look like? We're going to teach you how to create a vicious looking zombie bite from the comfort of your own home. All you'll need is to pick up a few things. Make sure you have some rigid collodion, extra flesh, and a bruise color-ring.

For the bruising and the oozing blood, pick up some squirt blood, stage blood, and a color palette. Go to your makeup bag for a stipple sponge, a triangle sponge, gray eye shadow, and small and medium makeup brushes. Now you're ready to create a zombie bite!Steps 1 through 4: Decide where you want your zombie bite mark to be. Take the rigid collodion and use it to mark the teeth placement. Dab the stipple sponge in the yellow and green colors in the palette and place it around the bite. Put the green closer to the wound and the yellow farther away to make the bruising look real. Next, grab the extra flesh in small pieces and manipulate two lines where the bottom and the top of the bite mark would be. Indent with a pen cap along these lines and then use the black from the color palette to paint inside each indentation. Now it's time to blend with the triangle sponge. Stipple and blend the wound with the red face paint. Add some yellow and green if you want!Step 5: Here come the veins! The veins make the wound look really creepy.

Use the small makeup brush and gray eye shadow to paint on the veins. Try to make them look like they are popping out of the wound.Finished Look: Finally, add as much blood as you want! What kind of zombie will you be once the wound is intact? Will you still have an intense hankering for pizza, or will you only want to feast upon brains and intestines. Let us know what zombie life is like!Peeling Scorched Skin Makeup TutorialIs there anything scarier than burned flesh? We don't think so! Now you can make your skin look like it has been scorched by flames. You just need a few supplies to make this happen. Grab liquid latex, some tissues, a medium makeup brush, and a triangle and stipple sponge. The bruise color-ring is a must as well as well as some clear lip gloss and your trusty tweezers. Now, we're ready to make magic happen!Steps 1 through 6: Put a thin application of liquid latex where you want the burn to be and place one tissue on top of that. Rip off access tissue and let it dry completely, then use your foundation and triangle sponge to cover the area once it's fully dry.