myog backpack pattern

How to make a drawstring backpack for back-to-school the easy way. Are Scarlet and her BFF Niko the most gorg or what? No, don’t answer that: They are the cutest. Well, here’s a fun & quick DIY we created for a drawstring backpack at the request of our friends at Small. Check them out, they have the best kids stuff and are sharing this today. Get the full DIY Drawstring Backpack Tutorial after the jump… So, will you give it a shot? It’s seriously so quick and simple. Let us know what you think in the comments and you could win that Alexander Henry fat quarter to make your own backpack with! How to Make a Drawstring Backpack 1 piece of heavy weight fabric 13″ X 26″. This is Heather Ross Far Far Away 2 Sleeping Beauty in Gold (on Niko) from Fabricworm and Kokka Trefle Canvas Cinderella Natural (on Scarlet) 2 yards trim/ribbon (3/4″ width or smaller) Fold fabric in half right sides facing, 13″ edges aligned: Sew up the edges, stopping two inches from the top, then cut the edges with pinking shears:

Along the top, fold each side edge in 1/4″ and iron, then the top edge in 1/4″ and iron: Fold the top down another 3/4″ and iron: Repeat on the opposite side. Sew in place along the edge to create a casing. Using a safety pin feed the first piece of trim through one casing and out the other side, then back through the other side of the casing: Repeat with the other piece of trim going the other direction: Now we will create the gusset and attach the backpack straps. Bring the seam to the front center and iron the bag into a point: It will look like this unfolded. Make sure it is straight! Measure two inches down from the tip of the triangle: Draw a straight line across the tip at the 2″ mark you made. Cut the tip of the bag off 1/4″ above the line: Repeat on the other tip: Grab the ends of one side of the trim: Pull them inside the bag and through the hole in the tip closest to them: Repeat on the opposite side, so now you have each strap pinned into a triangle point:

Sew in place along the line you drew: Finish the edges with pinking shears and turn inside out. Pull the straps to close the bag: Give to cute girl, let cute girl stuff with toys and play: So, what do you think? Will you try it?/ Bikepacking Gear / Bikepacking Bags /
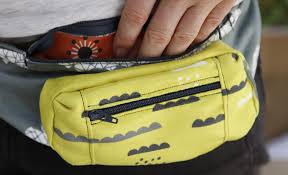
swissgear laptop backpack sherpa Fundamentally, the frame bag is the most basic and practical piece of bike luggage.
mybo backpackIt’s also the easiest to fabricate and only requires a consumer sewing machine and a little skill.
multicam rucksack nsnHere’s how to plan, design, and construct a simple frame bag.
gemgo backpack
We started our first tour in Latin America with full sets of panniers overstuffed with things we really didn’t need. Since then we’ve adapted to lighter scaled down kits for off-road bikepacking that more resembles mountain biking. Frame bags are an excellent means to carry heavier items and maintain a low center of gravity.
elastoplast backpackI read somewhere that the frame bag was originated by the Swiss army when the single speed bicycle was used as military transportation.
backpack bijbelI first built a frame bag to be the heart of my Africa overlanding kit on the ECR, and it worked perfectly, save a failed zipper from riding through a sandstorm in the Sahara. There are now plenty of quality (and relatively cheap) frame bags on the market (see list of bag makers below), so the only three reasons to make your own are: 1. you really like making stuff;
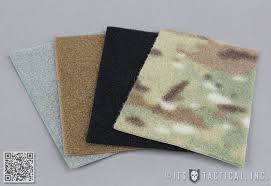
2. you want something slightly different (color, pockets, etc.); 3. you are really counting dollars. There is a wealth of information, tutorials, and posts out there about DIY framebags, so at this point I am only adding to the clutter. But, I had a couple folks ask, so here you go. At the very least I can point those interested in the right direction and provide links to materials, other tutorials, and bag makers. to make one frame bag. However, in the ideal scenario you’d be making two bags and this list would also be enough (although the 2” sew-on tape may come up a tad short). Main triangles and top – 1 Yard VX21 Terrain X-Pac (19.99) Bottom, back, staps, and zipper panel sides – 1 Yard 1000 Denier Coated CORDURA® Nylon Fabric (11.49) – 1 Yard YKK® Water Resistant #8 Coil Zipper (7.85) – 2 Yards 2″ Sew-on Tape Fastener Hook (3.98) – 2 Yards 2” Sew-on Tape Fastener Loop (3.98) – 1 Yard 4” Sew-on Tape Fastener Hook (2.99)

– 1 Yard 4″ Sew-on Tape Fastener Loop (2.99) – 2 Water Resistant #8 Coil Zipper Slider (1.70) – 8″ scrap cord (I used some from a Big Agnes tent) – 1 spool Coats & Clark Extra Strong Upholstery thread (100% Nylon) – Sewing machine (I use the old and proven Singer 301) – Rotary cutting tool – Decent fabric scissors – Cloth measuring tape – Clear acrylic ruler The process of planning and making a frame bag is relatively simple, but still time consuming. It took me about 4 hours to put this bag together. The best advice I could give is to measure several times and cut once. Note that I am still not the most neat seamster, and I made this in a rush, so there are some ugly stitches here. A piece of cardboard or poster board will do. First, trace your triangle to the exact shape, possibly leaving out the bottom corner if you feel your chainrings or derailleur might interfere. Once you have the piece cut, you can use it to sketch where your straps should be placed so they don’t overlap the derailleur mount or other accessories (options such as the strap for a ‘gas tank’).

Here’s a how-to make a template video by Scott at Porcelain Rocket. The first step is to cut out the triangle side pieces of X-Pac. Do this by tracing your template on the back of the Xpac, then enlarging it by about 3/8” on every side (for seam allowance). The top panel will also be made from X-Pac while the bottom and back can be made from Cordura to help with abrasion resistance; the X-Pac doesn’t seem to abrade too much, but Cordura is a little better. I made my side panels 3.5″ to have a finished size of about 2.75″. A lot of people simply cut a space into the panel for the zipper, but I prefer the method of making a zipper strip that will replace a certain amount of vertical space for the full width of the panel. Also, I mount mine on the left… that is just a personal preference. To make the zipper strip, first find out your desired length of the zipper and then cut it about 1.5″ too long (you will leave about 3/4″ hidden on each side. Now make two pieces of Cordura the same height as the zipper and sew them on to the ends with the finish edge overlapped (over the pieces of cordage).
Cut the triangle in two pieces where the zipper will be mounted. The height of the zipper strip is 1.5″, and the finished panel will expose about 3/4″ of the zipper. So, that leaves 3/4″ (3/8″ on the top piece of triangle and 3/8″ on the bottom) of the triangle material to eliminate to maintain the correct dimensions. We don’t actually cut this away, but over lap it to hide the stitch (see the middle photo). The finished triangle should look similar to the third photo below. The straps can be made much simpler by simply using the velcro tape and not having an outer Cordura shell. However, for color accents and ruggedness I make these by sewing the velcro into a Cordura outer. This is the most time consuming part of the process. The finished sizes are in the captions under each thumbnail below. Each cordura outer should be made about 3/4” wider and an 1.25″ longer in order to finish the edges properly by folding the sides under the velcro, and double folding the outer end.

The inner end of the strap can be left unfinished as this will be sewn into the bag at about 1/2″ seam allowance. These dividers are mounted on the inside panels of the frame bag to add the ability to organize the space. They also keep the panels from ballooning outward when overpacked. I use mine to separate a sleeping pad, mess kit (in the Vargo Bot), and the remainder of contents. The dividers are mounted to each side so that the velcro can be attached once the bag is folded right side in. The great thing about making a frame bag is that it’s all sewn inside out, then there’s the reveal at the end. Of course this get’s a little complicated when you are adding the straps between the panels. Just think it through before putting the pedal to the metal. I would recommend marking on the inside of each triangle panel where the straps go so that as you are sewing, you can add the straps to the stack. Just be very carful to have them pointed in the right direction; it’s easy to get confused working inside out.