mod backpack slots borderlands 2

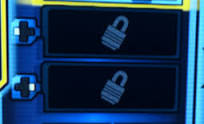
Sign up or log in to customize your list. My packrat-ness is getting to me, and I currently have 3 characters with banks just for storing items (one for purples, one for uniques, one for legendaries). What I'd really love to do is haxxor my Bank on one of those characters to be far larger. Gibbed's save editor seems to have potential but I don't see a specific option for this. I do however see a "raw" tab to edit specific data...but I also don't see any obvious way to do this. So using Gibbed's save editor (or another tool) is there a way to modify my bank storage count for a character above the maximum you can otherwise buy via Eridium? With the Gibbed's Save Editor open with your Characters Save file loaded (Borderlands 2 must be Closed!); Click on the Raw Tab. Click on the Down Arrow on the right side of Black Market Upgrades (Collection). Change the values for the 8th line down to 0 (Backpack), and the 9th line down to 0 (Bank). (You might also want to give yourself some more Eridium (500 Max) on the Currency Tab.)

Save your changes, and close the Save Editor. Go to the Black Market, in Sanctuary, and buy all the newly available Backpack & Bank Storage Upgrades. If you want higher ammo capacities; replace the other values for slots 1-7 to 12. It should just about double the ammo capacity. The easiest, and only way that I know of is to use Gibbed to overstuff the bank with any bankable item, and then swap it out with what you want to keep (You must swap or you will lose the space).
parra eels backpackI think the max is 42 slots.
stm switch padded laptop backpack You can also do this with your backpack, but its more trouble than it is worth unless you never want to trade with others or purchase from machines.
facom backpackI tried adding slots via the raw tab multiple times but they never stay after removing an item from the bank. The slot was just gone. The game must overwrite the added slots unless there is something in them. Just spawn them in using the save editor that's what I did and its working fine (BTW the method above has now been patched) Another thing you can do is retrieve the item code via Gibbed and save it to a text file (or word doc for example and accompany with screenshots or brief description). You can then reimport the item if you want/need it. It isn't often you need 42 different items in your current inventory so backing up the item codes is often enough. Thank you for your interest in this question. Because it has attracted low-quality or spam answers that had to be removed, posting an answer now requires 10 reputation on this site (the association bonus does not count). Would you like to answer one of these unanswered questions instead? Not the answer you're looking for?

Browse other questions tagged borderlands-2 or ask your own question. Borderlands 2 – The Inventory Screen Using Inventory & Vending Machine Screens in Borderlands 2 The other main interface you'll be spending a lot of time with is your weapons and gear inventory known simply as the Inventory Screen. The Inventory screen shows the weapons and gear you have equipped or the spare stuff you're carrying in your backpack either of which view can be brought to the foreground by clicking on the yellow arrow. Here's an example of what you'll see in your Inventory Equipped view early in the game: And the following is a rundown of what's going on: Equipped Weapon Slot #1 — Available to be filled with a favorite weapon when you start the game. When you're in 'play mode', e.g., in the middle of a battle, you can hit the 1 key to automatically switch to the weapon in this slot. Equipped Weapon Slot #2 — Available to be filled with a favorite weapon when you start the game.

When you're in 'play mode', you can hit the 2 key to automatically switch to the weapon in this slot. Equipped Weapon Slot #3 — This will remain locked until you complete the Plan B story mission (Chapter 5). Once unlocked (and in play mode), hit the 3 key to automatically equip the weapon in this slot. Equipped Weapon Slot #4 — This will remain locked until you complete the Bright Lights, Flying City story mission (Chapter 10). When this is unlocked, hit the 4 key to automatically equip the weapon in this slot. Shield Slot — You start seeing shields when you get to level 3. Shields soak up damage until they are depleted thus protecting your Health bar. The first shield you acquire will automatically be equipped in this slot. Class Mod Slot — Class mods are special pieces of equipment that are specific to each of the character classes. When they are equipped, they provide significant bonuses such as more health, faster reload speed, more damage from sniper rifles, etc.

Sometimes they also grant extra points to certain skills in the Skill tree. However to take advantage of these bonuses, you must have at least one skill point already allotted to that skill. Grenade Mod Slot — Grenade mods are items that you can equip in this slot to give special properties to your thrown grenades. For example, when throwing a 'normal' grenade, it will simply land and blow up. When throwing a grenade with a Fireburst grenade mod equipped, that same grenade will now land where you threw it and then turn into a spinning flamethrower lasting for about five seconds (one of the best grenade mods, by the way). Like weapons, grenade mods can and should be frequently swapped out with different grenade mods to adjust to the situation at hand. Relic Slot — Relics are similar to class mods in that they grant bonuses to your character except they are not character specific. Any character class can equip any relic. On a level per level basis, relics aren't nearly as powerful as class mods, e.g., a level 12 relic won't offer bonuses comparable to a level 12 class mod.
However you will eventually run into some higher level relics that grant very useful bonuses when equipped, for example, increasing your maximum health by 40%. Highlighted Weapon/Item Stat Card — This will pop up every time you hover over a weapon or item either equipped or in the backpack. It gives you detailed statistics and information on that weapon or item allowing you evaluate its capabilities. Ammo Box — This is all the ammunition you currently have in your possession. Note that you do not actually have to have a particular weapon type in your possession in order to stockpile ammo for it. The top number for each ammo type is how much ammo you currently have while the bottom number is the maximum amount you are currently allowed to carry for that ammo type. The maximum capacity for each ammo type can be increased by purchasing Storage Deck Upgrades (SDUs) from Crazy Earl in Sanctuary using Eridium as currency (more on this later in the walkthrough). Cash on Hand — This is how much cash you currently have in your possession.
You get cash from looting containers around the gamescape, picking up enemy kill drops, selling spare weapons and items and completing missions. If you play well, you could finish the game with over $200,000 to spare! So don't be afraid to spend money right from the get-go. Eridium Supply — This is how much Eridium you have on hand. Eridium is a special kind of purple mineral that you'll collect throughout your travels in Borderlands 2. You'll either find it randomly in loot containers (particularly cash boxes) or you'll earn it as a reward for completing some missions. The only use for Eridium is to purchase upgrades from Crazy Earl in Sanctuary which can increase weapon type ammo capacities, the size of your backpack and the size of other storage spaces that will become available later in the game. Backpack — Aside from your equipped weapons and items, you also have a backpack in which you can carry spare stuff. It is important to have spare weapons and items that you can swap out for your currently equipped items in order to deal with different kinds of threats.

The backpack is also useful for stockpiling loot (weapons and items you find while playing) to eventually carry back to the nearest vending machine and sell for cash. Most of your cash flow will come from looting and selling stuff you find. You start the game out with 12 spare slots in your backpack. This can be increased to 27 spare slots by purchasing upgrades from Crazy Earl in Sanctuary. (The following notes refer to the PC version of Borderlands 2.) Swapping Weapons — While in the Inventory Equipped view, you can swap any equipped weapon or item by first hovering the mouse over the equipped item you want to swap to highlight it and then press Enter to bring up the Backpack view alongside the equipped view. Scroll down the the item in the Backpack you wish to swap into the equipped spot and then press Enter again. Comparing Weapons — Weapons and items can be compared with one another by hovering over the weapon/item you wish to compare and then pressing the Action button ('e' key).
This will bring up two weapon stat cards with the weapon you initially highlighted for comparision now highlighted in green. You can now scroll through weapons on the other side and compare them with your green highlighted weapons. The stats on both weapon cards will now have either 'red down' or 'green up' arrows beside them. A red down arrow means the stat on this weapon is not as good as the one it's being compared to. A green up arrow means the stat on this weapon is better than the one it's being compared to. This will allow you to quickly evaluate which weapon is better. Favoriting and Trashing Weapons — If you hover over the right of any weapon slot in your inventory, you'll see either a yellow star or a red 'x'. You can click on either of these to designate the weapon/item as a favorite or as trash respectively. All items in your inventory with a red 'x' can be sold all at once at any vending machine by simply pressing the 'Delete' key on your keyboard while on the Purchase screen (oddly enough).